


Quick Start Samples
The HTML5 Samples are installed in the <Install Location>\Samples directory. The C# and .Net samples were created in Visual Studio 2010 in .Net Framework 4.0. The PCC Installer configures the samples to run out of the box on a machine with IIS installed.
PHP and JSP samples need to be configured manually. The PHP samples require PHP 5.0 or higher. JSP samples require Apache Tomcat 6 or higher.
We recommend you map the corresponding sample path as an alias on your web server. Please refer to Apache manual or Tomcat manual for details.
The Virtual Directories, PrizmCC_Samples_HTML5_CS and PrizmCC_Samples_HTML5_VB will be created. For more details on IIS samples configuration, refer to the Installation Guide.
If you choose to install all of the samples, the following IIS Applications will be created:
- PrizmCC_Samples_HTML5_CS - C# samples for embedding the HTML5 viewer in your application
- PrizmCC_Samples_HTML5_VB – VB.Net samples for embedding the HTML5 viewer in your application
You can run the samples in the following ways:
- From the Start menu, choose Programs | Accusoft | Prizm Content Connect | Samples and select the sample that you wish to run. Running the sample will launch the viewer in your browser.
- From the Start menu, choose Programs | Accusoft | Prizm Content Connect, open the Samples Folder and run the samples in Visual Studio by opening Project.sln. Set the default page to Default.aspx.
Adding Code for an HTML5 Project
The HTML5 Prizm Content Connect sample demonstrates the use of a JavaScript component, pccViewer, which communicates with a web service using a RESTful scheme as noted in the RESTful Web API topic. To add the html5 viewer, the following script files are required to be added for the web page:
- jquery-1.7.2.min.js
- jquery-ui-1.8.21.custom.min.js
- pccViewer.js
Along with a script (similar to the following) tying a desired document to be viewed to the pccViewer control object:
| CS.NET Example |  Copy Code Copy Code |
|---|---|
: <script type="text/javascript"> var documentName1 = '<%=document%>' $(document).ready(function () { var pluginOptions1 = { documentID: documentName1, toolboxMenuOpen: false, annotationID: 'Annotation Filename', uiElements: { toolTips: true, fullScreenToggle: true, firstLastPage: false} } $("#imageGearPageView").pccViewer(pluginOptions1); }); </script> |
|
The pluginOptions1 description can be found in the HTML5 Viewer topic.
The imageGearPageView object is named div object where the viewer will be anchored:
| CS.NET Example | Copy Code |
|---|---|
:
    <div id="imageGearViewer">
        <div id="imageGearPageView">
        </div>
    </div>
|
|
To set up the service web environment, either a traditional web.config file can be used or a more generic .xml file like the prizmconfig.xml used in the HTML5 sample. The prizmconfig.xml contains named tags or elements which specify where documents are obtained, where intermediate images are cached and where the imaging services, the proxyserver, can be located for its image rendering services.
|
XML Element |
Content |
Purpose |
|
DocumentPath
|
.\ |
Location of document folder for displaying document images. |
|
TempcachePath |
%ALLUSERSPROFILE%\Accusoft\Prizm\Cache |
Location where the proxyserver will deposit rendered images. . The parameter contained within the percentage symbols, ALLUSERSPROFILE, is an environmental parameter denoting the default base path for reading and writing access. |
|
MarkupsPath |
%ALLUSERSPROFILE%\Accusoft\Prizm\Markups |
Location where named annotation files are stored and retrieved. |
|
WebServiceScheme |
http |
Communication protocol to the proxyserver. |
|
WebServiceHost |
localhost |
Domain or host of the proxyserver. |
|
WebServicePort |
18660 |
Port number for proxyserver. |
These elements can be changed or added to suit the environment needed by the deployed prizm application. In the HTML5 sample, the PccConfig code file is used to parse these tags and provide a property interface for each xml element.
The PccConfig code file has a static method, LoadConfig, which can be used like the following code snippet to obtain the environmental parameters to execute the web tier service of the application. The call should be made early in the web application page using the prizm services.
| Example | Copy Code |
|---|---|
<body>
:
<%
    // Environmental Setup
    PccConfig.LoadConfig("prizmconfig.xml");
%>
:
</body>
|
|
The other code file pieces needed have to do with supporting the pccViewer RESTful communication scheme to the service side Web tier and onto the proxyserver image rendering service.
|
File |
Description |
|
App_Code Folder |
Contains the supporting classes for environmental configuration and the RESTful communication scheme between the pccViewer and web tier service. While the code body for the classes can be modified as needed, the APIs modifications need careful care if changed. See PCC.ashx. |
| PccViewerServices | Assembly shared for both vb and c# samples. Source is in a separate directory and moves the communication backend between the web tier and imaging services (proxy server) into its own namespace and class objects. See the PccViewerServices topic section for details. |
|
Js folder |
Contains the required Javascript files making up the pccViewer entity. |
|
Images folder |
Graphics for pccViewer. |
|
Css folder |
Web style sheet for the pccViewer. |
|
Default.aspx |
The default web starting page. The pccViewer would typically reside on this page. |
|
PCC.ashx |
File which defines and links the required prizm RESTful interface to the files in the App_Code folder. The client side pccViewer Javascript object will use this RESTful interface as described in RESTful Web API. File is required for the functionality of the IIS ASP.NET environment. |
|
Prizmconfig.xml |
Contains modifiable parameter content locations for documents, cache folder and proxyserver connection. |
|
Web.config |
Contains IIS and web tier settings. |
|
Sample.doc |
For the HTML5 sample, the test document used to illustrate the functional prizm content connect product. |
With all these pieces, a web application page can be put together using a query parameter to pass in the document to be viewed. The following HTML5 sample illustrates a simple web Default.aspx application solution using the document parameter for the query string to get the document to view:
| CS.NET Example | Copy Code |
|---|---|
<%@ Page Language="C#" AutoEventWireup="true" CodeFile="Default.aspx.cs" Inherits="_Default" %> <!DOCTYPE html PUBLIC "-//W3C//DTD XHTML 1.0 Transitional//EN" "http://www.w3.org/TR/xhtml1/DTD/xhtml1-transitional.dtd"> <html xmlns="http://www.w3.org/1999/xhtml"> <head runat="server"> <title>PCC HTML5 Sample</title> <link rel="icon" href="favicon.ico" type="image/x-icon" /> <link href="Default.css" rel="stylesheet" type="text/css" /> <script src="js/jquery-1.7.2.min.js" type="text/javascript"></script> <script src="js/jquery-ui-1.8.21.custom.min.js" type="text/javascript"></script> <script src="js/pccViewer.js" type="text/javascript"></script> </head> <body> <form id="Form1" runat="server"> <div id="confidentialNotice"><p>Content Connect Sample</p> </div> <% // Environmental Setup PccConfig.LoadConfig("prizmconfig.xml"); string document; document = Request.QueryString["document"]; if (document == null) { Response.Write("You must include the name of a document in the URL.<br/>"); Response.Write("For example, click on this link: <a href=\"Default.aspx?document=sample.doc\">Default.aspx?document=sample.doc</a>"); return; } string documentLocation = PccConfig.DocumentFolder; string tempLocation = PccConfig.TempFolder; string originalDocument = System.IO.Path.Combine(documentLocation, document); %> <script type="text/javascript"> var documentName1 = '<%=document%>' $(document).ready(function () { var pluginOptions1 = { documentID: documentName1, toolboxMenuOpen: false, annotationID: 'Annotation Filename', uiElements: { toolTips: true, fullScreenToggle: true, firstLastPage: false } } $("#imageGearPageView").pccViewer(pluginOptions1); }); </script> <div id="imageGearViewer"> <div id="imageGearPageView"> </div> </div> </form> </body> </html> |
|
PccViewerServices Library Module
The Prizm Content Connect version 7.0 HTML 5 .Net samples are redesigned from the previous version 6 samples to help modularize the design and simplify the web tier customer sample. The communication portion from the web tier to the back end imaging services (proxy server) are encapsulated into a new assembly and namespace, PccViewerServices. Also, a new feature of this assembly is the ability to get vectored or, more precisely, SVG data instead of just raster JPEG or PNG images. Of course, SVG data can only be generated from appropriate document sources like office documents (i.e. PDF, DOCX, etc.).
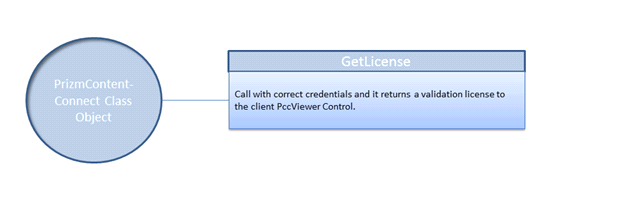
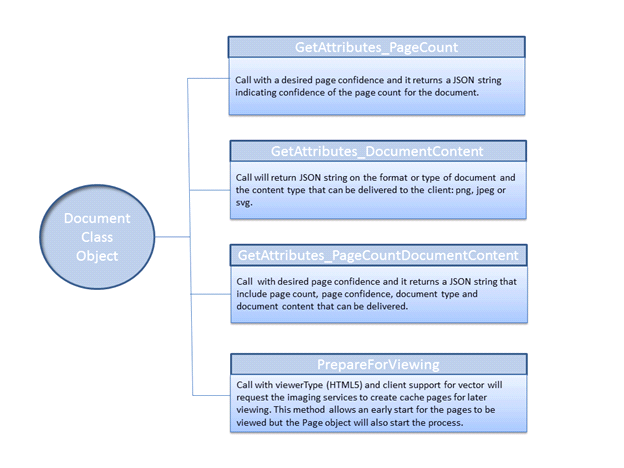
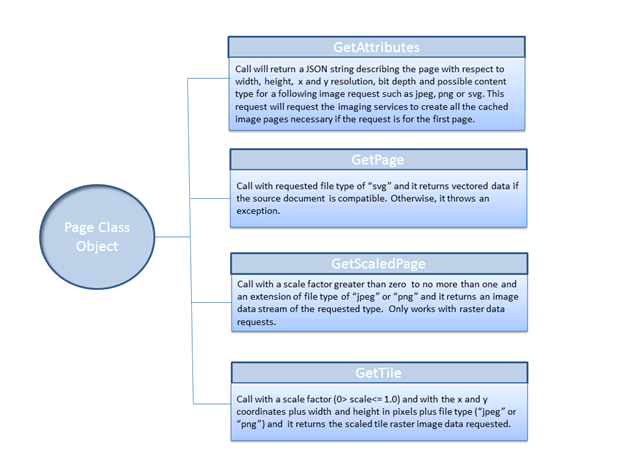
The HTML5 Web Tier samples instantiate three class objects from this namespace which perform most of the necessary operations requested by the web client PccViewer control. The class object PrizmContentConnect in PccViewerServices assembly services the license operation in the GetLicense class and is invoked by the client PccViewer control to establish license validity. The other two objects are Document and Page which acquires document information and image data streams as requested by the web client control. The GetAttributes, GetImage and GetImageTile classes instantiate the Page object for their functionality. The DocumentInformation and GetDocumentAttributes classes use the Document class object for their functionality. Essentially, the web tier samples perform the task of acquiring or parsing the data from the web RESTful URL requests and pass the information into the PccViewerService objects which communicates with the imaging services and returns the requested data. This module performs the steps as outlined in the User Guide section on the Using Prizm > Architecture > HTML5 topic of this document.
The following diagrams outline the key essential functionality of these objects, but see the Developers Guide (API Reference) section for all the methods and their details.
There a few more class object in PccViewerServices which the web application developers may wish to use or modify but they are there to support the fore mentioned objects and can be ignored. In fact, the ResultCache class object must only be modified with care as the imaging services expect file name templates with a precise syntax. Changing the name templates will degrade the imaging services performance. And there are a couple of class objects that closely duplicate the web tier PccHandler child classes but exist for the use of the PccViewerServices module.
JSP Samples
JSP samples are based on C# samples implementing objects of PccViewerServices Library Module.
JSP Samples requires Apache Tomcat 6 or higher to be installed. Apache Ant™ 1.9 or higher and Java JDK 1.6 is required compile the sample WAR file.
The structure of the JSP samples is described in following table:
| build.xml | Ant build script. |
| PccViewerServices/ | Sub-module with PccViewerServices library implementation. |
| Sample/ | Web module with JSP and Java code. |
| Sample/public_html/ | Web resources folder, it stores the JSP sample files. |
| Sample/public_html/WEB-INF/lib/ | Sample web application runtime libraries folder. |
| target/ | Folder created by build.xml script. It contains compiled and assembled code, i.e. PCCSample.war. |
Use following files to configure the web application:
-
public_html/index.jsp – main JSP page containing JS code that loads the viewer application.
-
public_html/WEB-INF/web.xml – J2EE web application configuration file. This file used to configure handling of the web request and web application settings.
It might be necessary to configure the values in web.xml to fit your local Prizm Service installation.
Following table describes the Prizm configuration parameter values and its purpose:
| Parameter Name (param-name) | Parameter Value (param-value) | Description |
| DocumentPath |
|
Path where the source documents are located. |
| TempcachePath |
|
Path where the temporary cache files are located. |
| MarkupsPath |
|
Path where the temporary markup files are located. |
| WebServiceScheme | http | Prizm Service REST API web service scheme. |
| WebServiceHost | localhost | Prizm Service REST API web service hostname. |
| WebServicePort | 18680 | Prizm Service Proxy REST API web service port number. |
The JSP samples can be compiled using Apache Ant™ compiler.
On Windows, this can be achieved by executing the following set of commands on command line terminal (cmd.exe):
| Copy Code |
|
|---|---|
cd C:\Prizm\Samples\Html5\jsp set ANT_HOME=C:\apache-ant-1.9.0 set JAVA_HOME=C:\Program Files\Java\jdk1.6.0_43 set PATH=%PATH%;%ANT_HOME%\bin;%JAVA_HOME%\bin; ant clean ant war |
|
Note that the above example commands assume:
-
Apache Ant™ is installed in C:\apache-ant-1.9.0\
-
Java JDK is installed in C:\Program Files\Java\jdk1.6.0_43\
-
Prizm is installed in C:\Prizm\
On Linux, please refer to documentation how to install Apache Ant™ as described at http://ant.apache.org/manual/index.html.
Then, issue the ant compiler commands inside JSP sample root folder, e.g.:
| Copy Code |
|
|---|---|
# cd /usr/share/prizm/Samples/html5/jsp/ # ant clean # ant war |
|
The result of a successful build is the PCCSample.war file located in target folder under JSP sample root folder.
Follow the Tomcat documentation instructions on how to redeploy newly compiled PCCSample.war.